
Access control security for Quarkus web apps
Secure a Quarkus web app with Keycloak using SecuRole®
Quarkus is an ultra-fast Java framework and modern programming platform for developers that replaced Thorntail in the microservices area in 2020. In fact, it is described by Red Hat as the “next-generation Kubernetes-native Java framework”.
To ensure secure programming in Quarkus, it is important to equip the web application with appropriate access control, which is possible using the open source software Keycloak. However, Keycloak by itself is not enough to give programmers the correct and exclusive access to their areas in Quarkus. From a modern security point of view, the separation of authentication and authorisation is recommended. For this purpose, the authorisation framework SecuRole® is a good choice, which is an extension of Keycloak.
The profile – short introduction to SecuRole:
- What is SecuRole®?
- SecuRole® is an innovative approach for agile role management to overcome limitations of existing approaches and enable fine-grained access control through optional parameters.
- ZeroTrust Approach from SecuRole® (end-to-end security on authorisation information):
- SecuRole® provides a secure process to transport authorisation information about users, and the data they are allowed to access, to a client application.
The client application can then verify every request by checking the signature of the authorising authority. In contrast to transporting authorisation information using a classic OAuth2 or SAML2 enabled SSO system, this provides end-to-end security. In a world where identity providers are becoming more and more interconnected, it is important to have a reliable way of proving a user’s authorisations.
- SecuRole® provides a secure process to transport authorisation information about users, and the data they are allowed to access, to a client application.
- Technical Implementation:
- Transported as a JWT
How to integrate Quarkus & Keycloak?
Setup your Quarkus web application as explained in the following guides:
- Using OpenID Connect (OIDC) to Protect Service Applications using Bearer Token Authorization
- Using OpenID Connect (OIDC) and Keycloak to Centralize Authorization
- Using OpenID Connect (OIDC) to Protect Web Applications using Authorization Code Flow
- Security Tips and Tricks
Once the application and Keycloak are configured, accessing a page protected by Keycloak – when not already logged in – should redirect the user to the login page.

Getting the SecuRole
Quarkus offers a very flexible way to customise the SecurityIdentity. With a SecurityIdentityAugmentor, we can add new information to it and thus add the SecuRole.
Map the attribute in Keycloak
Let’s assume that the SecuRole is stored as a user attribute in Keycloak.
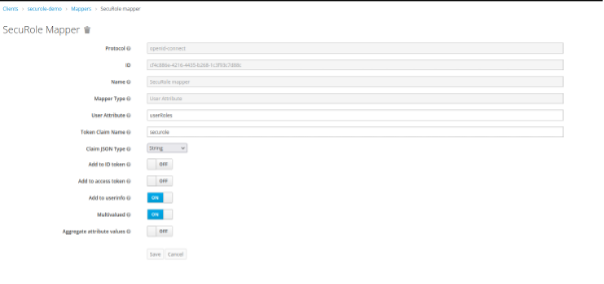
OIDC mapper configuration page
quarkus:
oidc:
authentication:
user-info-required: true
Now Quarkus will automatically fill the attribute “userinfo” of the SecurityIdentity object by calling the corresponding endpoint, and Keycloak will provide the content of the userRole attribute. At this point, the name of the roles are still not directly accessible, since a SecuRole given by the mapper looks like this; a list of “##”-separated strings:
loginalliance:MUSCA:MUSCA_ACCESS:eyJhbGciOiJSUzI1NiJ9.eyJzdWIiOiI5NTczNjUwMzE0NjQ1OTciLCJhdWQiOiJNVVNDQSIsInZlciI6IjEuMC4wIiwibmJmIjoxNjI0NjE0NjU1LCJpc3MiOiJpbnRlbnNpb24gZ21iaCIsInJsZSI6Ik1VU0NBX0FDQ0VTUyIsInBybSI6IlRoaXMgcm9sZSBpcyBib3VuZCB0byB0aGUgZW52aXJvbm1lbnQgb2YgaW50ZW5zaW9uIGdtYmgiLCJleHAiOjQ3ODM4NDAyODcsImlhdCI6MTYyNDYxNDY1NSwianRpIjoiNyJ9.EkjuC5ZALxOb8Z-dwCpsmxq7ieMS3bg48BukVG-qJ3qWVvr6F8yMbiKa5T3yHujmyuzzMuJulf7pcY8x4mnBmxvxeA_74GbZ-FEkVN7R3-T7po4Ubl9xMtzWhVQgWoqKv2IsAs3Y2OXtwM7v1E5gOqBH5ExAcZNr3xfczasL8u2GnzPHcYbNkKztxId8cizXPWykKGAwz-STvCCTmSeXlOBK14-V3Zr2kQmqw_cVJsiIS2tBtyHB1oNzddLEj4qpFMMES–v1AFISl8w6pcG-ZuBbXKI0SOrhHebYhQ2Ep-HBtol6zf3a8J9qFNcbtsFkUmSqg86gfYBQ9UzeK9_sw##loginalliance:DEMO:APPLICATION_ACCESS:eyJhbGciOiJSUzI1NiJ9.eyJzdWIiOiI5NTczNjUwMzE0NjQ1OTciLCJhdWQiOiJERU1PIiwidmVyIjoiMS4wLjAiLCJuYmYiOjE2MjQ2MTQ3MDksImlzcyI6ImludGVuc2lvbiBnbWJoIiwicmxlIjoiQVBQTElDQVRJT05fQUNDRVNTIiwicHJtIjoiVGhpcyByb2xlIGlzIGJvdW5kIHRvIHRoZSBlbnZpcm9ubWVudCBvZiBpbnRlbnNpb24gZ21iaCIsImV4cCI6NDc4Mzg0MDI4NywiaWF0IjoxNjI0NjE0NzEzLCJqdGkiOiI5In0.XE0Zp-iSuFhgQZ3Z4wOCg9VPdNtBqfFlimKmr5bS4_orRHDYCdVNaHYpTGzYgjejN8Ad6kM67MziH-PuNckzrv8mKqEFsfy2jq_mW508VYW8iDIkY6BaJ5_kir3E7_DkeUNDs3YUr2w5RWo-bLlr6C0N0tEcPjiWtAi2xn_D6U2mnXlFnMNvuD-fGbfmtlC08zWQOHX_wMkR-WcnSUrtY5gBxcNgzkWVtIVNi1ue9VMfSWbUtoeKL8RKdc0bkGVoGYutA59nLmbr9qyOwjytyW1HVcujwVzBsKrGtVzwHyi142iZTBt765_Gy1V-xEksrZot-CEymD9BCURJPG6UEw##loginalliance:MyProfile:LOGIN:eyJhbGciOiJSUzI1NiJ9.eyJzdWIiOiI5NTczNjUwMzE0NjQ1OTciLCJhdWQiOiJNeVByb2ZpbGUiLCJ2ZXIiOiIxLjAuMCIsIm5iZiI6MTYyNDYxNDY1NSwiaXNzIjoiaW50ZW5zaW9uIGdtYmgiLCJybGUiOiJMT0dJTiIsInBybSI6IlRoaXMgcm9sZSBpcyBib3VuZCB0byB0aGUgZW52aXJvbm1lbnQgb2YgaW50ZW5zaW9uIGdtYmgiLCJleHAiOjQ3ODM4NDAyODcsImlhdCI6MTYyNDYxNDY1NSwianRpIjoiOCJ9.D5CN-i2EFeZshl8d8oMLFK80-M9jzDPM-qHvjyqtLBlLEmCRyNgJumj-99eExE1ifF9wH2GgHu7FC_QJ6A2Ma1XtZd1eqIJ0-BY6mxylHYBfMHHgA–B58SRz_MCRozNCPM2WtQhFXkCsD6LzzXmBm9GOLasYenHEz5hSRvS_QDeHsjB7Cfy-7rNGBU3enI-V4uY0rlTV8ygwWq6NzjYMzjio6WV18I7HqRbUFFKTj6rEgIBYJIRT5n87QqAOvVaZN-A8i_KSuhRbTqVkLFzUHcNYIqNseDzMTDptOHpHTbXyqQrOKX6GEQ_xkXHNe49duLZg97NfcbJ0y66ustNtw
There is already some information in clear text, but actually, the secured part is contained in the JWT, e.g.:
eyJhbGciOiJSUzI1NiJ9.eyJzdWIiOiI5NTczNjUwMzE0NjQ1OTciLCJhdWQiOiJNVVNDQSIsInZlciI6IjEuMC4wIiwibmJmIjoxNjI0NjE0NjU1LCJpc3MiOiJpbnRlbnNpb24gZ21iaCIsInJsZSI6Ik1VU0NBX0FDQ0VTUyIsInBybSI6IlRoaXMgcm9sZSBpcyBib3VuZCB0byB0aGUgZW52aXJvbm1lbnQgb2YgaW50ZW5zaW9uIGdtYmgiLCJleHAiOjQ3ODM4NDAyODcsImlhdCI6MTYyNDYxNDY1NSwianRpIjoiNyJ9.EkjuC5ZALxOb8Z-dwCpsmxq7ieMS3bg48BukVG-qJ3qWVvr6F8yMbiKa5T3yHujmyuzzMuJulf7pcY8x4mnBmxvxeA_74GbZ-FEkVN7R3-T7po4Ubl9xMtzWhVQgWoqKv2IsAs3Y2OXtwM7v1E5gOqBH5ExAcZNr3xfczasL8u2GnzPHcYbNkKztxId8cizXPWykKGAwz-STvCCTmSeXlOBK14-V3Zr2kQmqw_cVJsiIS2tBtyHB1oNzddLEj4qpFMMES–v1AFISl8w6pcG-ZuBbXKI0SOrhHebYhQ2Ep-HBtol6zf3a8J9qFNcbtsFkUmSqg86gfYBQ9UzeK9_sw
-
- The first part specifies the used algorithm:
eyJhbGciOiJSUzI1NiJ9 - {
- “alg”: “RS256”
} - Then the payload, which actually contains the name of the role:
eyJzdWIiOiI5NTczNjUwMzE0NjQ1OTciLCJhdWQiOiJNVVNDQSIsInZlciI6IjEuMC4wIiwibmJmIjoxNjI0NjE0NjU1LCJpc3MiOiJpbnRlbnNpb24gZ21iaCIsInJsZSI6Ik1VU0NBX0FDQ0VTUyIsInBybSI6IlRoaXMgcm9sZSBpcyBib3VuZCB0byB0aGUgZW52aXJvbm1lbnQgb2YgaW50ZW5zaW9uIGdtYmgiLCJleHAiOjQ3ODM4NDAyODcsImlhdCI6MTYyNDYxNDY1NSwianRpIjoiNyJ9 - {
- “sub”: “957365031464597”,
- “aud”: “MUSCA”,
- “ver”: “1.0.0”,
- “nbf”: 1624614655,
- “iss”: “intension gmbh”,
- “rle”: “MUSCA_ACCESS”,
- “prm”: “This role is bound to the environment of intension gmbh”,
- “exp”: 4783840287,
- “iat”: 1624614655,
- “jti”: “7”
- The first part specifies the used algorithm:
}
- Finally the signature:
EkjuC5ZALxOb8Z-dwCpsmxq7ieMS3bg48BukVG-qJ3qWVvr6F8yMbiKa5T3yHujmyuzzMuJulf7pcY8x4mnBmxvxeA_74GbZ-FEkVN7R3-T7po4Ubl9xMtzWhVQgWoqKv2IsAs3Y2OXtwM7v1E5gOqBH5ExAcZNr3xfczasL8u2GnzPHcYbNkKztxId8cizXPWykKGAwz-STvCCTmSeXlOBK14-V3Zr2kQmqw_cVJsiIS2tBtyHB1oNzddLEj4qpFMMES–v1AFISl8w6pcG-ZuBbXKI0SOrhHebYhQ2Ep-HBtol6zf3a8J9qFNcbtsFkUmSqg86gfYBQ9UzeK9_sw
Check signature
It is now possible to extract the role out of the payload and verify the signature of the JWT to be sure that it has not been manipulated. To do this, it is possible to use the Nimbus JOSE + JWT library that permits an easy check of the signature against a provided public key.