
Keycloak .NET adapter
How to also use the Keycloak authentication functions in Microsoft® Visual Studio and .NET environments
How to connect Keycloak to .NET applications
Keycloak is the open source solution for identity and access management, which is focused on the development of modern applications and services. With Keycloak you can safely implement the authentification to applications and services with less or no code.
The main difference between Keycloak and other solutions is that Keycloak is an independent product and not just a library. This means that the software can run independently. If you have a multitude of applications and systems that were developed with different technologies, and would like to realise the authentication and authorisation, then Keycloak is a reliable and very good choice. Keycloak functionality is very extensive and has multi-client capability. The user-friendly SSO solution provides an easy to use user interface.
To integrate Keycloak with applications and systems, there is by default a complete series of so-called „client adapters“.
What are Keycloak client adapters?
Keycloak client adapters are libraries that make it very easy to reliably implement the authentication of applications and services with Keycloak. That is why we call them “adapters” and not a “library”, because they enable close integration with the underlying platform and framework. This makes it easy to use the Keycloak client adapter, and you need considerably less code than what is normally needed for a library.
Before we describe the Keycloak .NET Adapter in more detail, let’s first of all begin with the installation of Keycloak.
Installation of Keycloak
Keycloak was developed with Java and the Java application server Wildfly. There are very comprehensive installation instructions for this, which is described in the documentation. In our example, we want to focus on a quickly available, Docker-based test server on which we want to quickly develop our first sample applications.
We don’t explain how to install Docker here; that is quite straightforward. Go to the Docker homepage if you need help. We simply assume that you have already installed Docker on your computer and that it works correctly.
There are whole series of Docker images on the Docker website. We will use the official “standard package”, which basically contains an immediately useable Keycloak installation, including a database and everything else. You can pass a couple of environment variables with which you can directly create the admin account, because one is not created by default.

docker run --name keycloak -p 8080:8080 -e KEYCLOAK_USER= -e
KEYCLOAK_PASSWORD= jboss/keycloak
As a result, Keycloak will be integrated with port 8080 of the host computer. As soon as the machine has started, open your browser and go to localhost:8080. The start page of Keycloak should be shown.
Note: We wouldn’t recommend using this Keycloak installation in production, because there are no redundancies at all and no backup. Feel free to contact us if you have any questions about this.
Keycloak standard admin interface
Click the Administration Console link, and login with the combination of the username and password that you defined in the Docker run command. You should now see the administration page of Keycloak.
This means your Keycloak instance is functional and ready to use.

Keycloak standard admin interface
Configuration of Keycloak
We won’t delve too deeply into the configuration of Keycloak in this article. The only thing that is necessary to protect our application is to create a client.
To do this, click the Clients option in the left menu. A list of pre-defined clients is shown. Click on the Create button on the top right. Choose a name in the displayed menu, e.g. demo app, and keep the client protocol as OpenID Connect.
Then, make sure that you configure a valid redirect URL. To simplify this, add an * to allow any redirect URL. Also activate “implicit flow” by activating the check box.
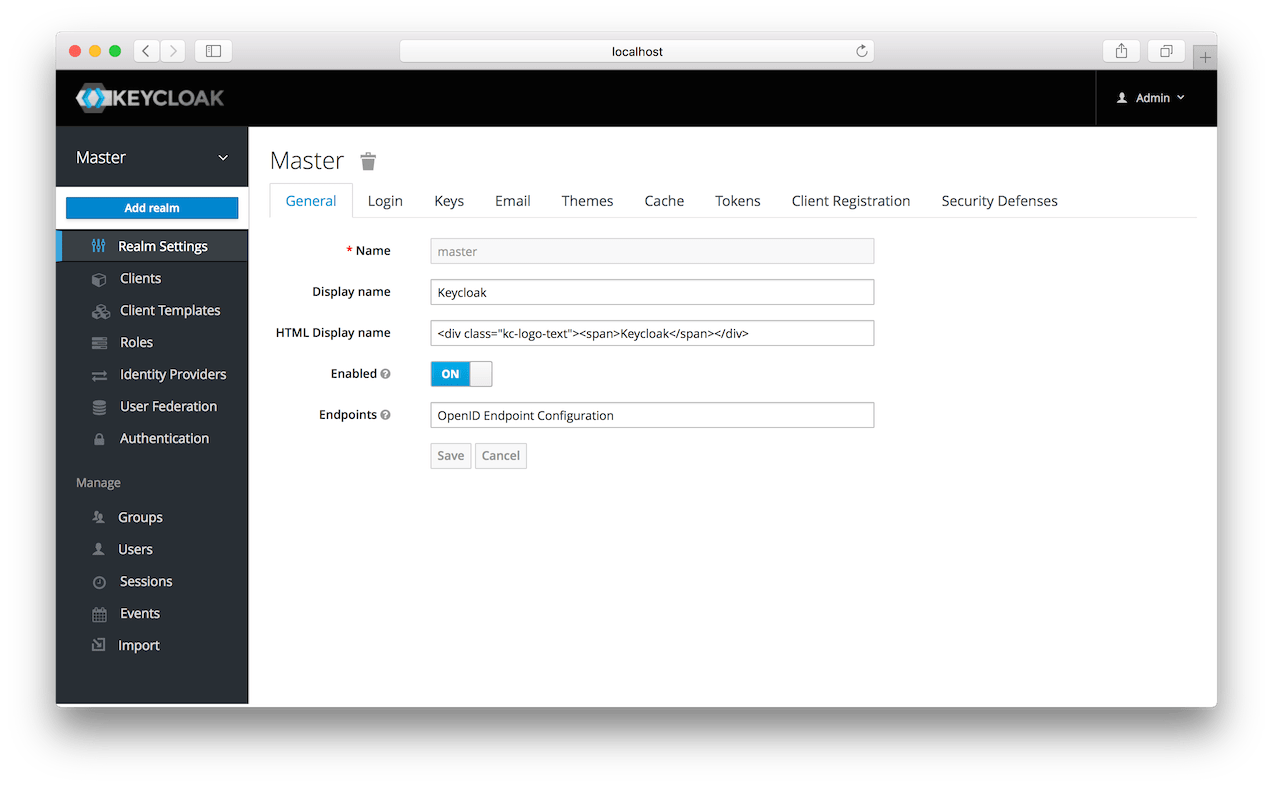
Menu point “Clients” (left) in the Keycloak standard admin interface
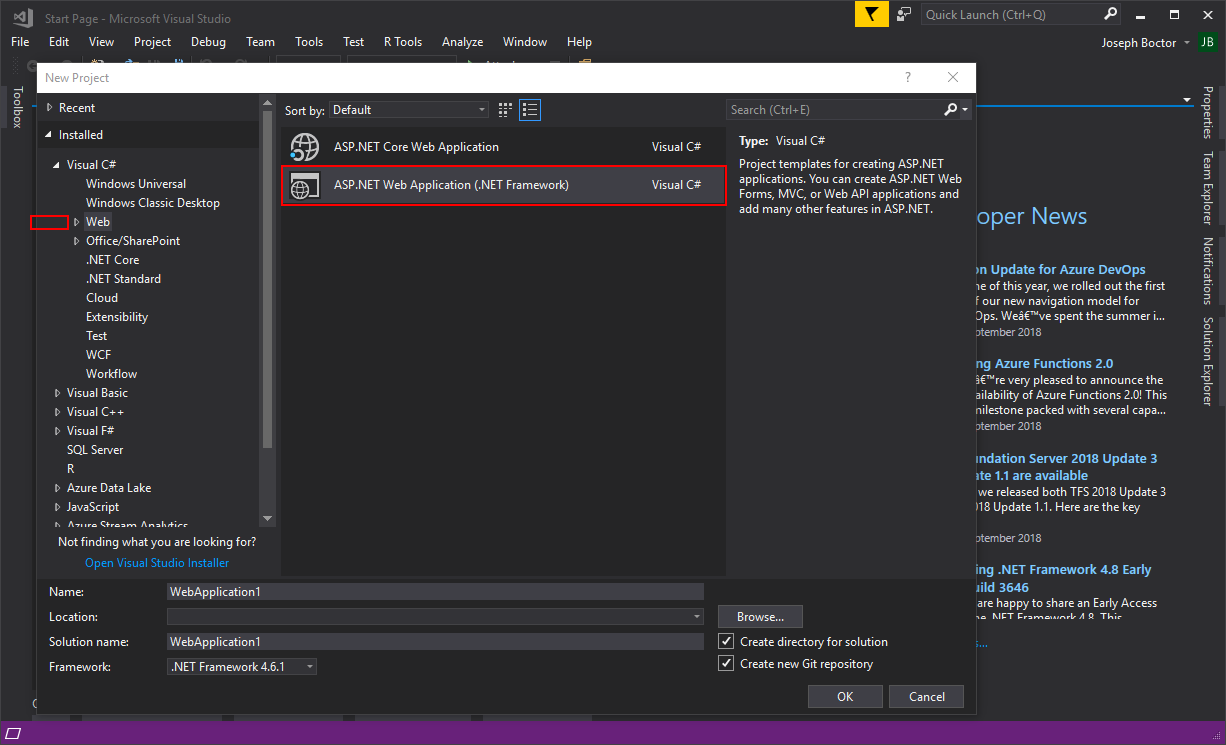
Creation of the Asp.NET MVC application
A new ASP.NET MVC application is created in Microsoft Visual Studio with the wizard for new projects.
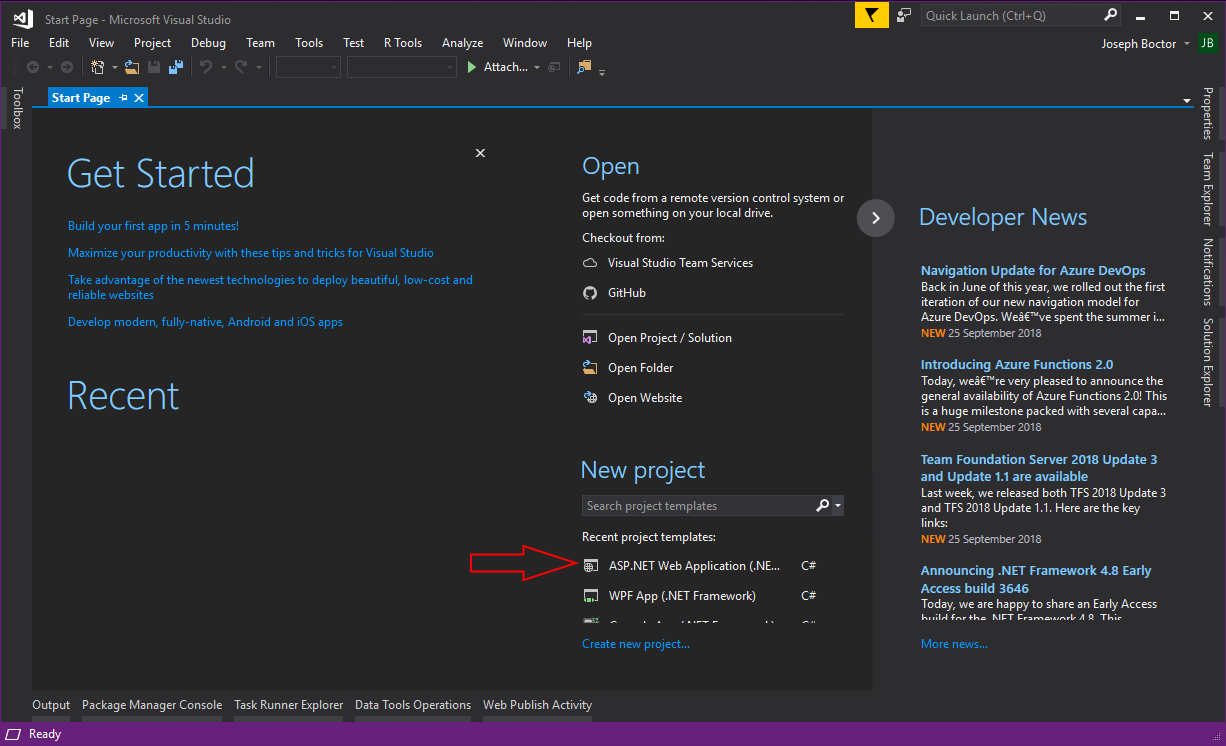
Then, we select the project type, so that Visual Studio can create the project directory with the necessary files.
Keycloak .NET Adapter
THIS SECTION IS BEING REVISED BECAUSE THE CONTENT IS OUT OF DATE. PLEASE CONTACT US DIRECTLY IF YOU HAVE ANY QUESTIONS.
Keycloak was developed completely in Java. However, you can also use Keycloak to securely execute the authentication of applications and systems that have been developed in any programming languages. This works as long as there is an adapter that manages the connection.
The most frequently used adapters are the Java adapters that are supported by Red Hat. However, Keycloak can also be used with ASP.NET MVC Web applications. There is only one adapter developed by the community for .NET applications from Dylan Plecki. The adapter has several bugs. In addition, there are problems posted in the GitHub repository that have no longer been maintained for a long time.
In November 2017, the developer of the adapter announced that he is looking for a maintainer. The maintainer is supposed to take over maintenance of the adapter, because the developer no longer has time for this himself.
Joseph Boctor, former software developer and .NET expert at Syntlogo GmbH, contacted him and obtained maintainer rights for the repository. He directly added two bug fixes to it for the bugs that have confronted him so far.
Unfortunately, he was not able to update the NuGet package that was created, because he didn’t have the API key of the Nuget.org account of the original developer.
Joseph also split the software repository. He created a separate account on nuget.org so that he was able to upload the updated package without bugs. He gave the package a different name to be able to differentiate between the original and fixed versions.
Since both Keycloak as well as .NET are to platforms that are in demand, Joseph, former software developer at Syntlogo GmbH, has become involved in the open source project. And, he is now the primary maintainer of the Keycloak .NET adapter.
The bug fixes and functional enhancements carried out in the meantime are made available here – naturally freely accessible to the community:
Login Alliance / Syntlogo GmbH continues to develop the Keycloak .NET adapter and offers professional support.
Integration of the Keycloak .NET adapter
The first step is the integration of the adapter in your solution via the NuGet Package Manager Console in Visual Studio.

Installation of the KeyWin Keycloak .NET adapter
Then, we add the libraries to the startup.cs file and connect it with Keycloak.
Important elements are the client name, secret, realm name of Keycloak and the URL of the Keycloak server.
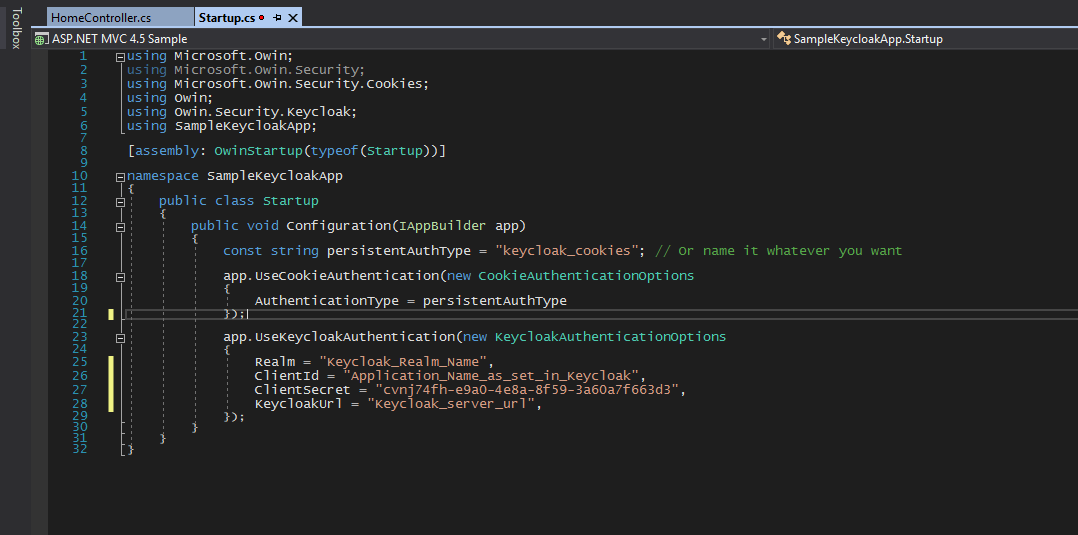
Connection to the Keycloak .NET adapter
After we have configured the connection to Keycloak, we still have to notify the application which users can login and which roles that are to be given. To do this, we can look in the controller classes where we can give each action result its own role. If the user logs in, then the application assigns the respective roles to him.

Role assignment in Keycloak .NET adapter